Clearing DNS cache is an easy and quick process. The procedure is the same for almost all Windows systems. For the example below, we will be using Windows 10.
To flush DNS on your Windows machine:
1. Load the Command Prompt as an administrator. Open the Start Menu and start typing the command prompt until you see it in the results.

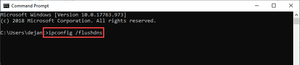
2. Type ipconfig /flushdns when the prompt loads and hit Enter on the keyboard.
3. The process should take only a few seconds. You should see the DNS Resolver Cache confirmation message when it’s done:
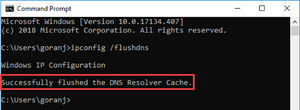
The DNS Cache database on your computer is now clear. You should get the correct and updated IP mapping from DNS servers next time your machine sends a DNS query.
How To Flush DNS Cache on Mac
There are a few different commands to use for flushing DNS cache on OS X and macOS depending on the version you are running.
As the procedure is the same on all versions, this article details how to clear DNS on macOS Mojave (10.14) and then list the commands for other versions in a table.
Flush DNS on macOS Mojave (version 10.14)
To clear DNS cache on macOS Mojave, use the Terminal application:
- Run terminal.app using your preferred method. You can launch the app from Applications -> Utilities or press Command + Space to launch Spotlight and search for Terminal.

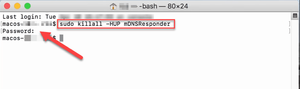
2. Type in sudo killall -HUP mDNSResponder and hit Return on your keyboard.
3. Enter the administrator password for the account in question and hit Return.
There is no notification when the process finishes.